


Overview
The Admin setup lets you control the configuration that applies to all the users in your organization.
Unlock the Admin Panel
The Admin Panel contains a number of the operations required to set up the template. These operations are password protected as they need only to be completed by the administrator and should not be available for modification by everyday users. Click here to view detailed steps to unlock the Admin Panel.
Set Up BI Reports
Simplified Loader templates use BI Reports to retrieve data from Oracle Fusion. BI Reports need to be set up once for each template for each environment. This can only be completed by a user with access to the BI Administrator role. Click here to view detailed steps to set up BI Reports.
User Registration
User registration for Simplified Loader is administered using Lookup Values. The System Administrator within your organization must first define the template-specific Lookup Type in Fusion ERP. The Lookup Type will be used to maintain users. Click here to view detailed steps to add users.
Setup DFF
DFF fields configured in Oracle Fusion can be set up in the Simplified Loader template with a click of a button. The DFF fields need to be set up once for each template.
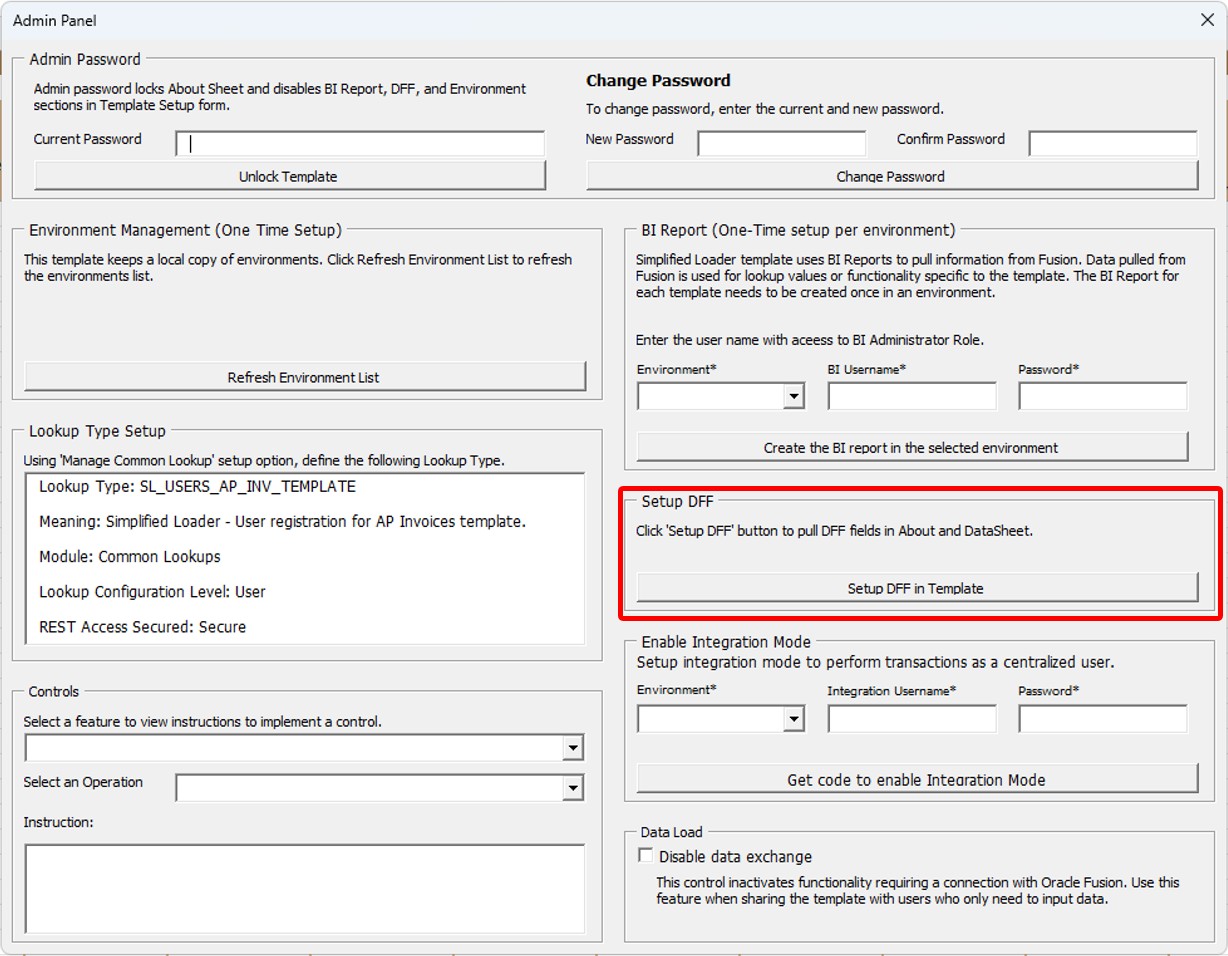
1. Open Admin Panel
2. Click 'Setup DFF in Template' from the Setup DFF section. Simplified Loader will read DFF fields from Oracle Fusion and add them in the About sheet and DataSheet.
3. If the user is not signed in to any environment, they will receive a login form to log in to Oracle Fusion. Select the environment and log in to Oracle Fusion. If the user is already logged in, then the Setup DFF wizard will not ask for login credentials again.
4. The following popup is displayed to configure 'Display Default Values' functionality in the Simplified Loader template. Click 'Yes' to set up constant default values in the Simplified Loader template from the DFF configuration defined in Oracle Fusion. The default option is 'No'.

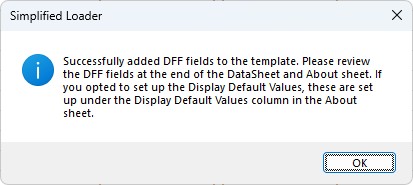
5. After completion, the user receives a confirmation message.
6. Setup DFF section now displays the environment and time when Setup DFF wizard retrieved details from Oracle Fusion.
7. The DFF fields are added at the end of the DataSheet and About sheet.

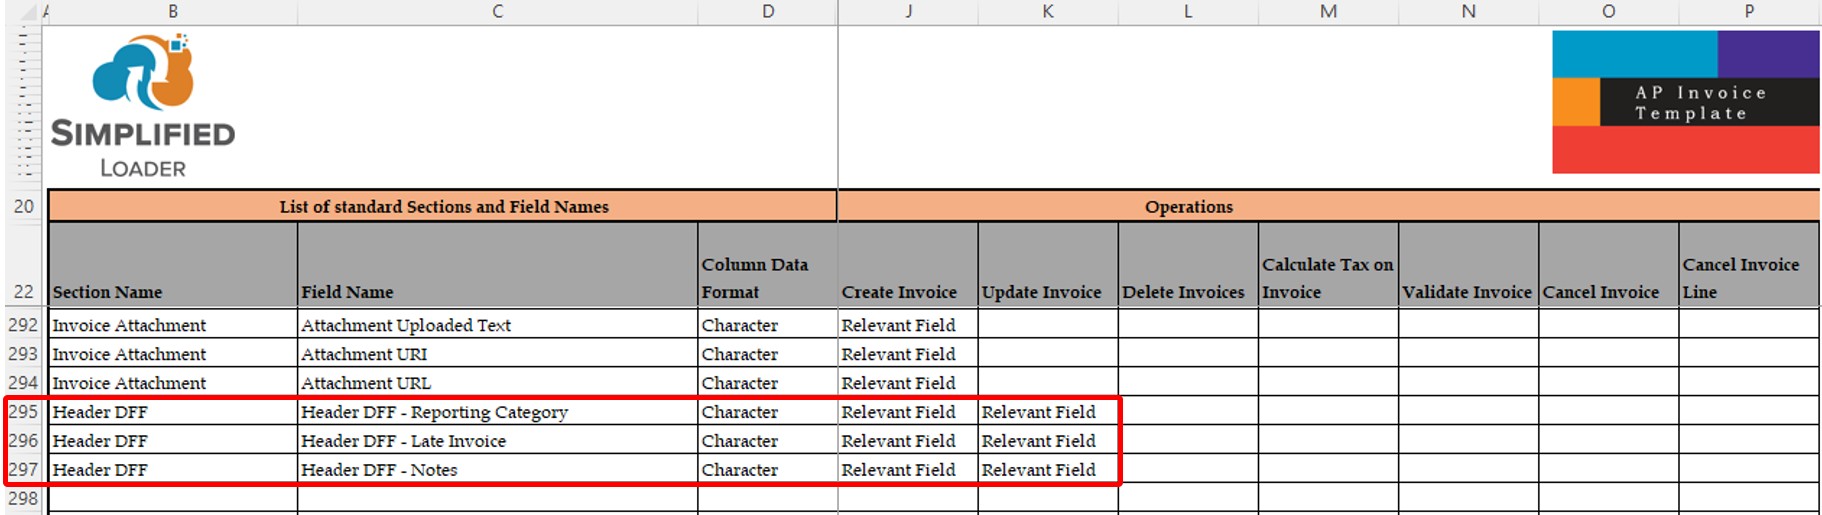
8. Like other fields, the DFF fields can be organized (e.g. moved, hidden, or deleted) in the DataSheet.
Setup mandatory fields or default values
The administrator can define mandatory fields or define default values for each operation available in the template. The default values defined by the administrator are different from the user default values entered by the user in DataSheet.
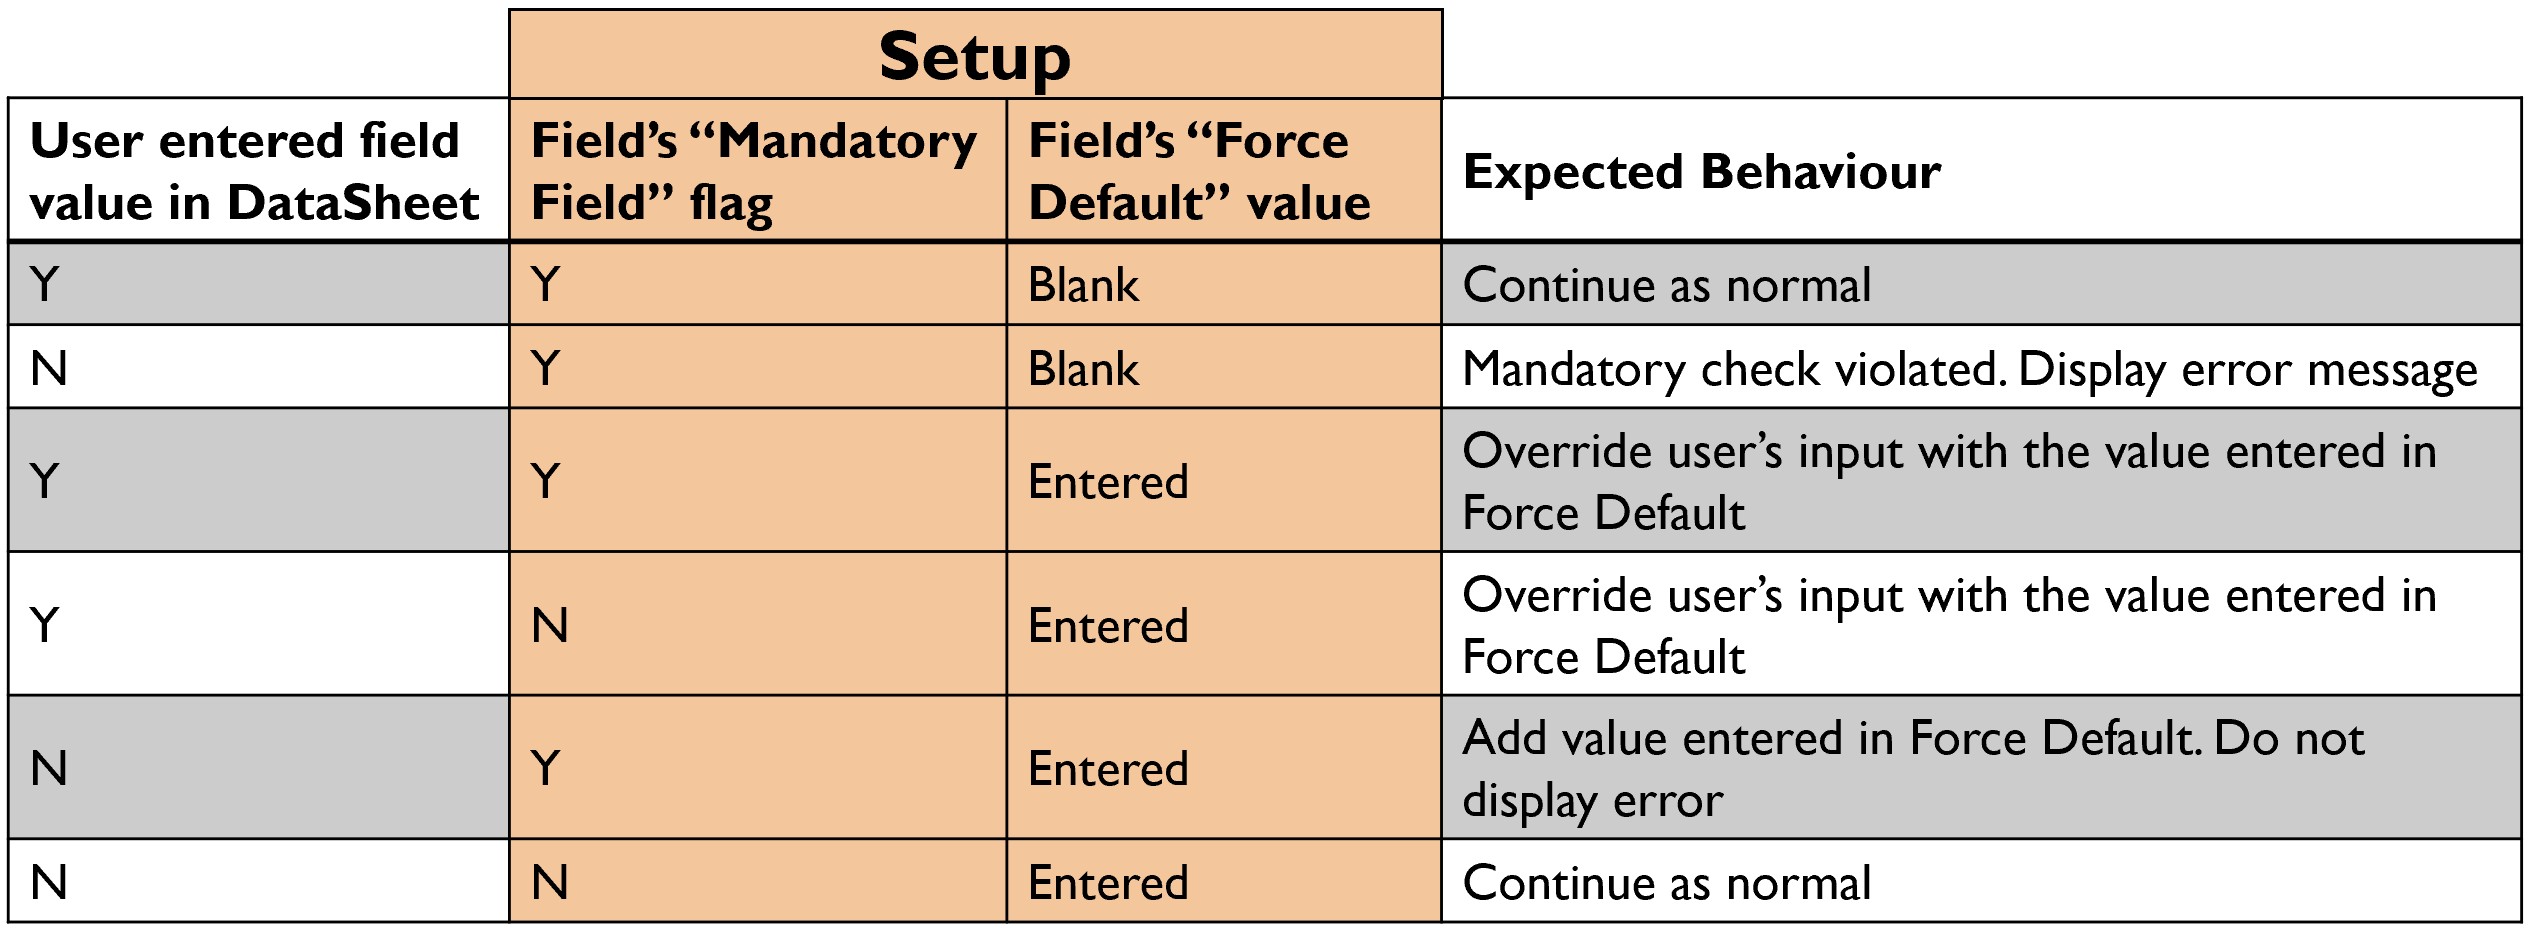
The following table highlights application behaviour when the administrator sets up Mandatory Field and Force Default values.
1. Unlock the Admin Panel
2. Unlocking Admin Panel also unlocks the About Sheet
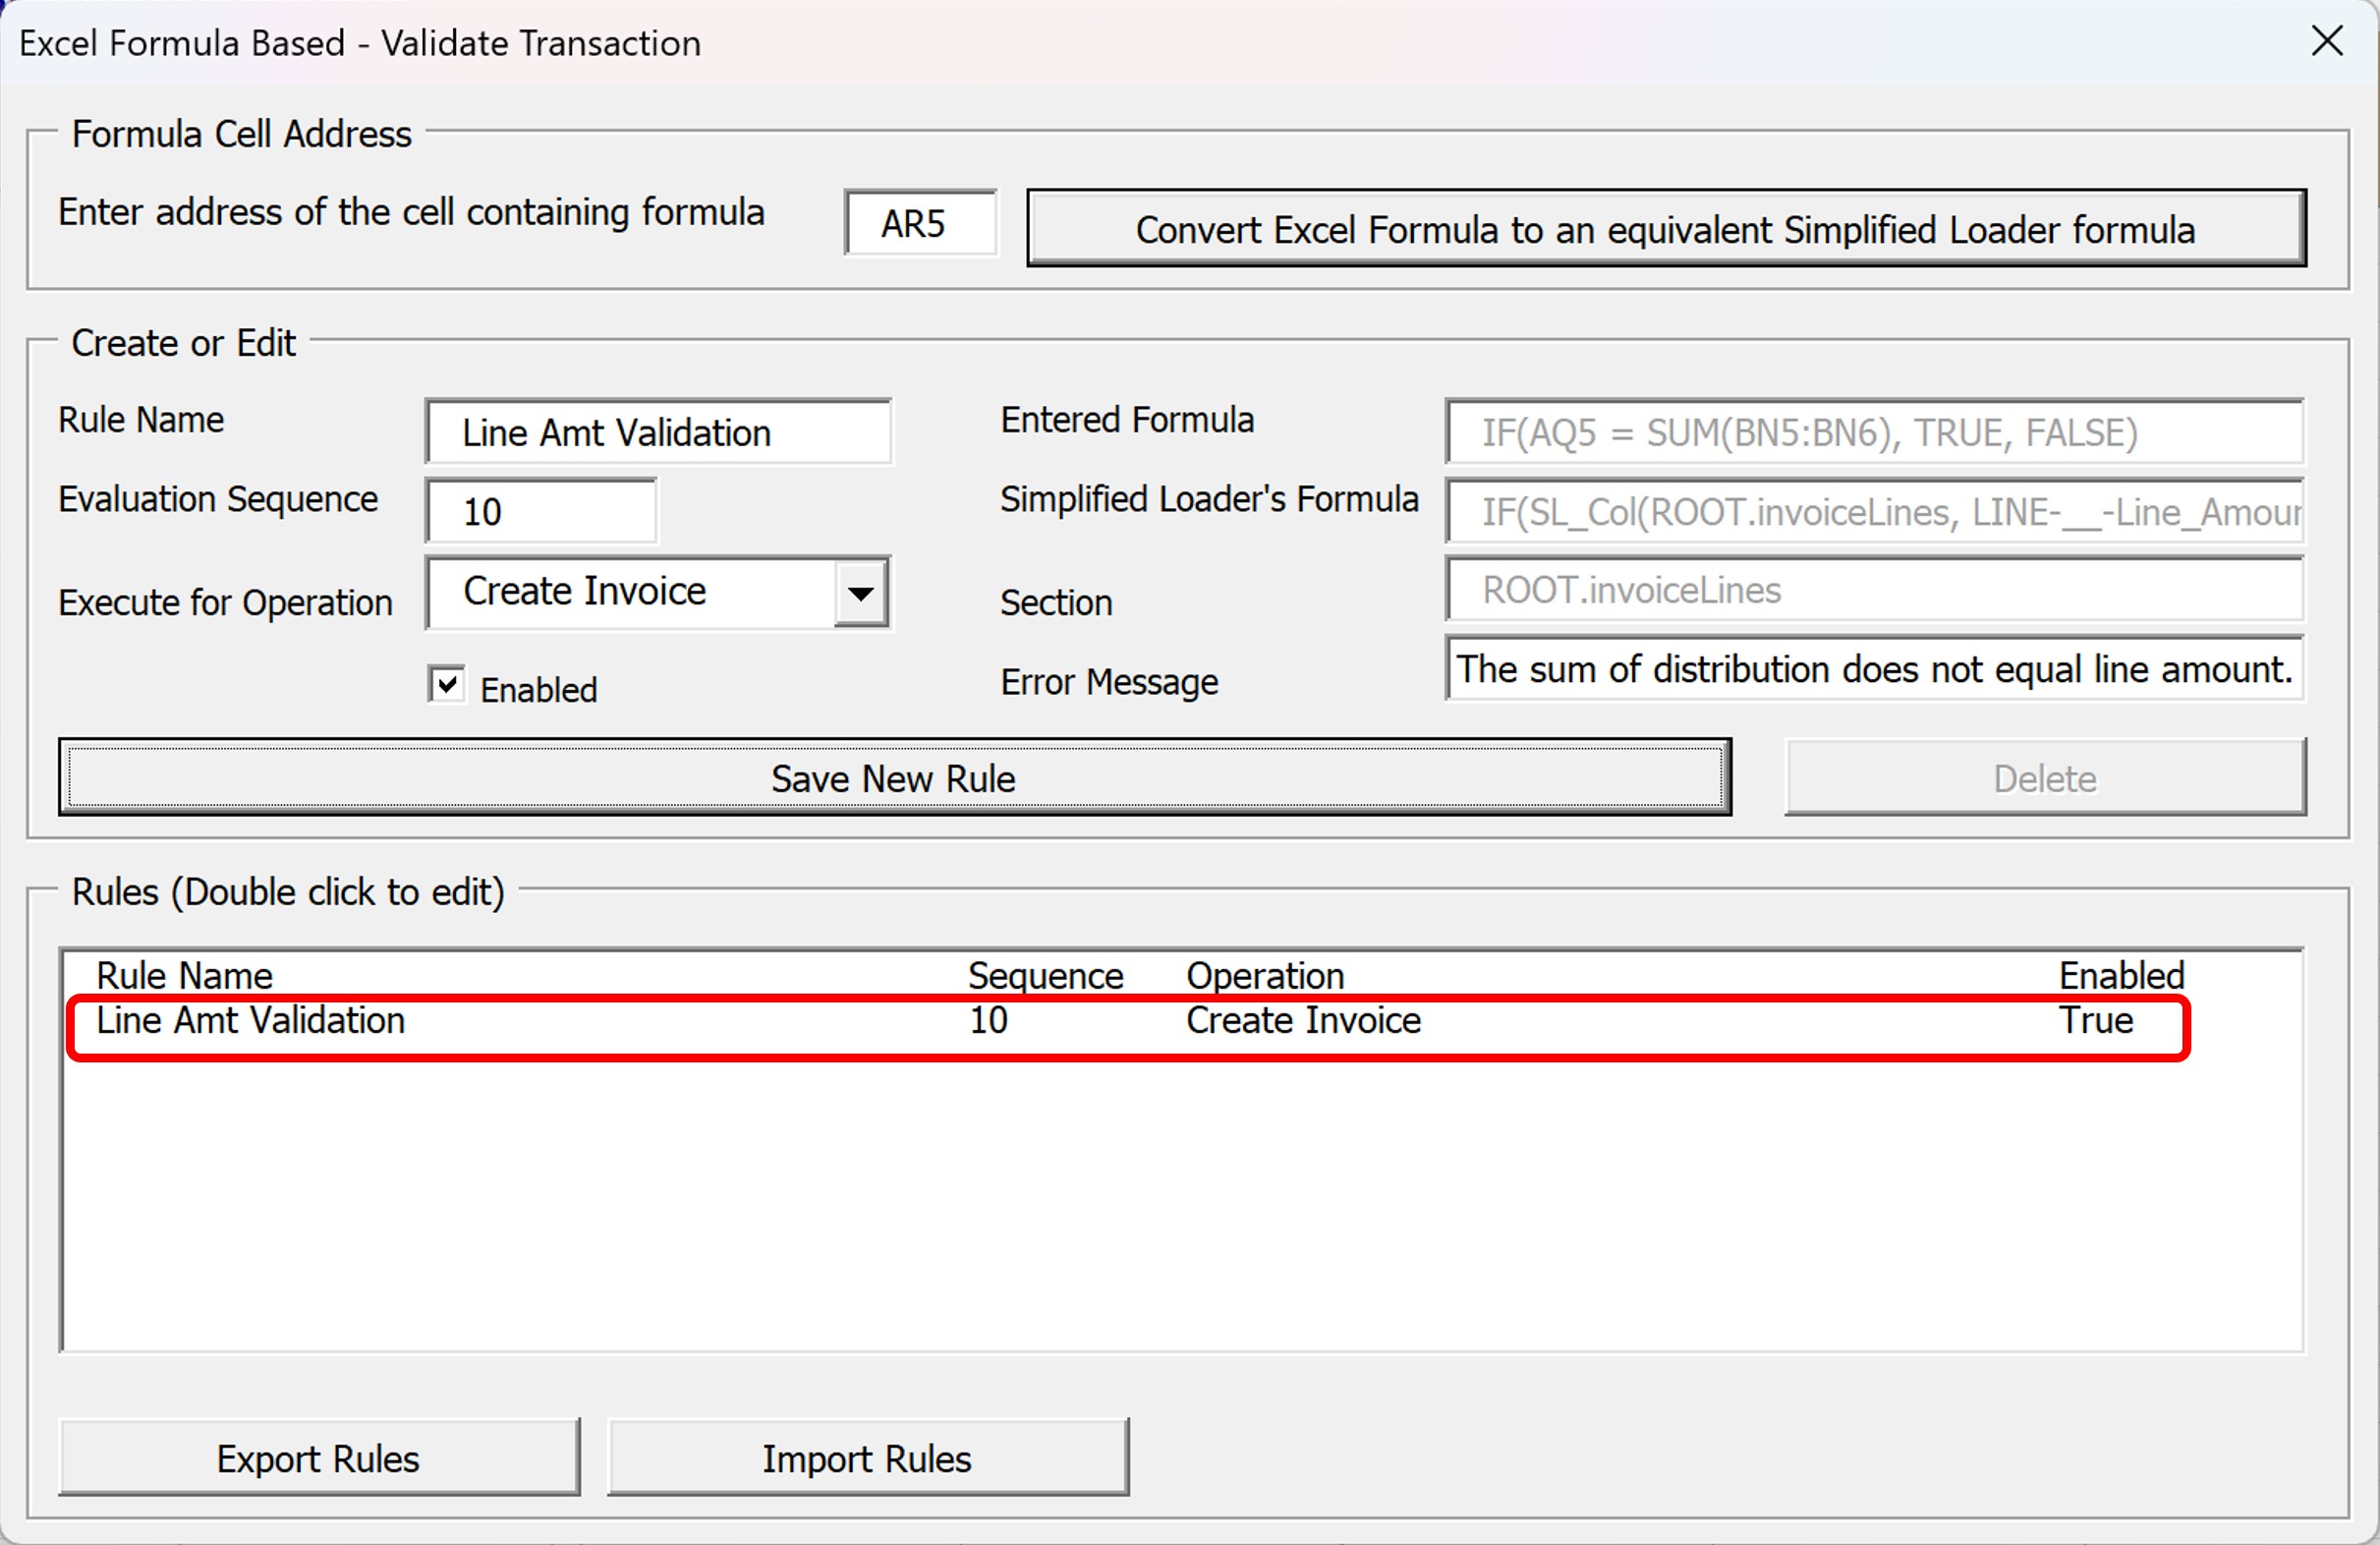
3. In row # 22, you will see the list of all operations supported by the template
4. Create an additional column in the About sheet. In row # 22, enter the name of this column as one of the following:
- Mandatory Fields: <Operation Name>
- Force Default: <Operation Name>
NOTE 1: Defining both 'Mandatory Fields' and 'Force Default' columns is not mandatory. Based on the requirement, you can define both fields or only one field.
NOTE 2: The columns for each operation should be individually defined. If the same default value applies to two operations, then define two instances of the 'Force Default' column, one for each operation.
5. In the 'Mandatory Fields' column, enter 'Y' to indicate a field as a mandatory field
6. In the 'Force Default' column, enter value against the field to define a default value
7. Repeat steps 4 – 6 to define mandatory fields and default values for each operation.
NOTE: Mandatory Field or Default Values setup comes into effect when the user enters at least one value in the section containing mandatory fields or default value setup. For example, if Admin sets up the 'Dist Tax Name' field in the Distribution section as mandatory with the force default value 'STD TAX'. With this setup, when creating a Invoice, if the user don't enter data in any field in the Distribution section, then both mandatory field or default value checks will not be performed. This is because the entire Distribution section is omitted from processing. To overcome this limitation, the admin can define a mandatory section using the 'Mandatory Sections' feature.
Excel Formula Based - Validate Transaction 
Excel formulas can be used to validate transaction values before they are passed to Oracle Fusion for processing. To set up validation using an Excel formula, an administrator needs to perform a one-time setup to define the validation formula and error message. Once the Excel template containing the validation formula is shared with users, they can continue performing their operations as usual. During operation execution, the validation rules set up by the administrator will automatically trigger before the values are passed to Oracle for processing.
To write a formula, it is essential to identify the section for which the values should be validated. This is important because the validation formula will trigger for each new record of the section. For example, if the validation section is defined at the line level, and the transaction contains 5 lines, the validation will trigger for each line. Similarly, if the validation is defined at the header level, the validation will trigger only once.
After determining the validation section, enter the formula in the DataSheet. Below are the mandatory guidelines for writing a formula to validate a transaction: - Enter formula in any field of the validation section - The formula must return either TRUE or FALSE. False indicates that the validation failed. - Use an Excel aggregate function when referencing fields in child sections (in the context of the validation section) - The formula can reference relevant fields from the validation section - The formula can reference relevant fields from sections that are either parents or children of the validation section
After writing the formula based on these guidelines, include the formula in the transaction validation process using the Controls section of the Admin Panel.
Worked Example from the Payables Invoice Template This example validates if the sum of all distributions matches the line amount. Note: The Payables Invoice template contains three sections: Header, Lines, and Distributions. The Lines section is a child of the Header, and the Distributions section is a child of the Lines.
1. For this scenario, the validation section should be set to Line level. This ensures the validation triggers for each line in the transaction.
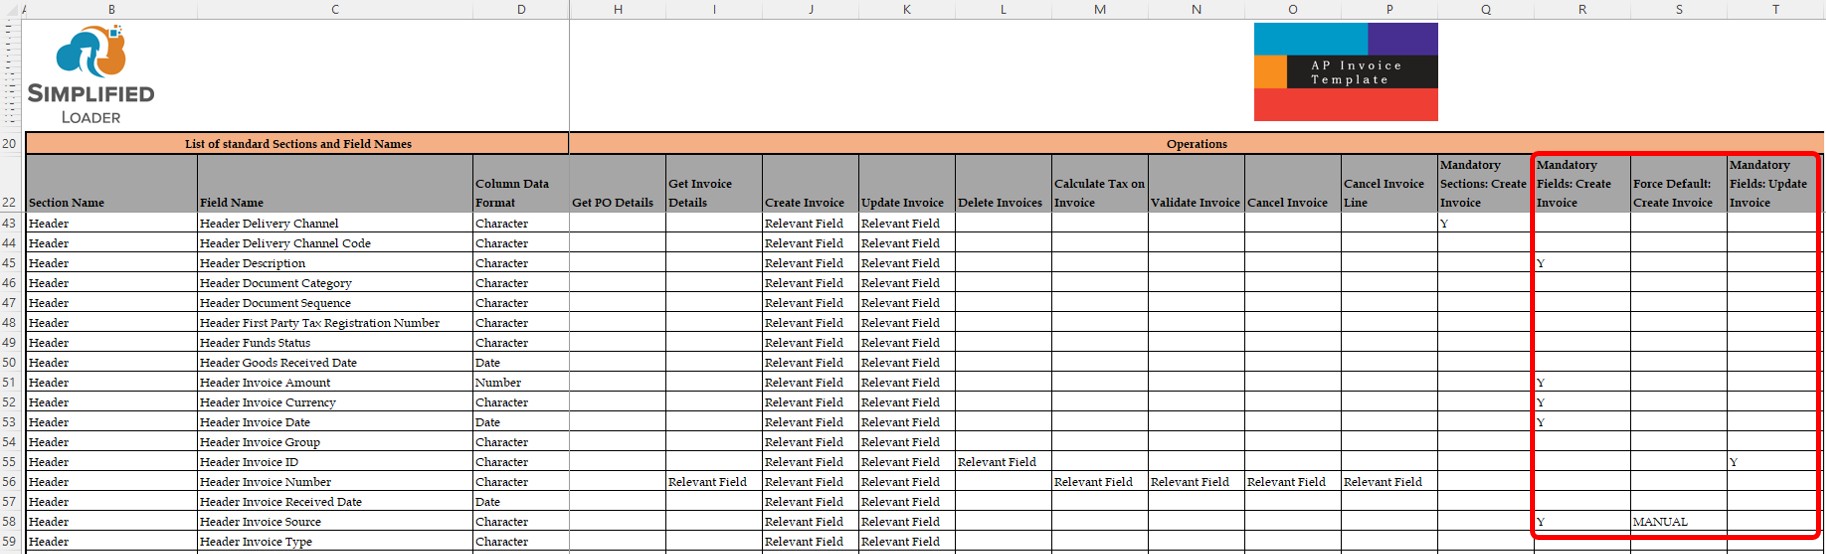
2. Write the formula in any field belonging to the Lines section. In the screenshot, the formula is entered in the 'Line Purchasing Category' field. Enter the formula:
=IF(AQ5 = SUM(BN5:BN6), TRUE, FALSE)
Note 1: By writing the formula in the 'Line Purchasing Category' field, Simplified Loader knows that the validation needs to fire at the Line level. This is because the 'Line Purchasing Category' field belongs to the Line level. Note 2: Column BN contains the "Dist Amount" field. Note 3: The range BN5:BN6 specifies the distribution rows. Defining a range of two rows does not limit Simplified Loader to just two rows. It indicates that there could be one or more rows. Simplified Loader will evaluate all distribution rows in the formula's range during transaction processing.
3. Note that the formula is entered in cell AR5.
4. Navigate to the Admin Panel.
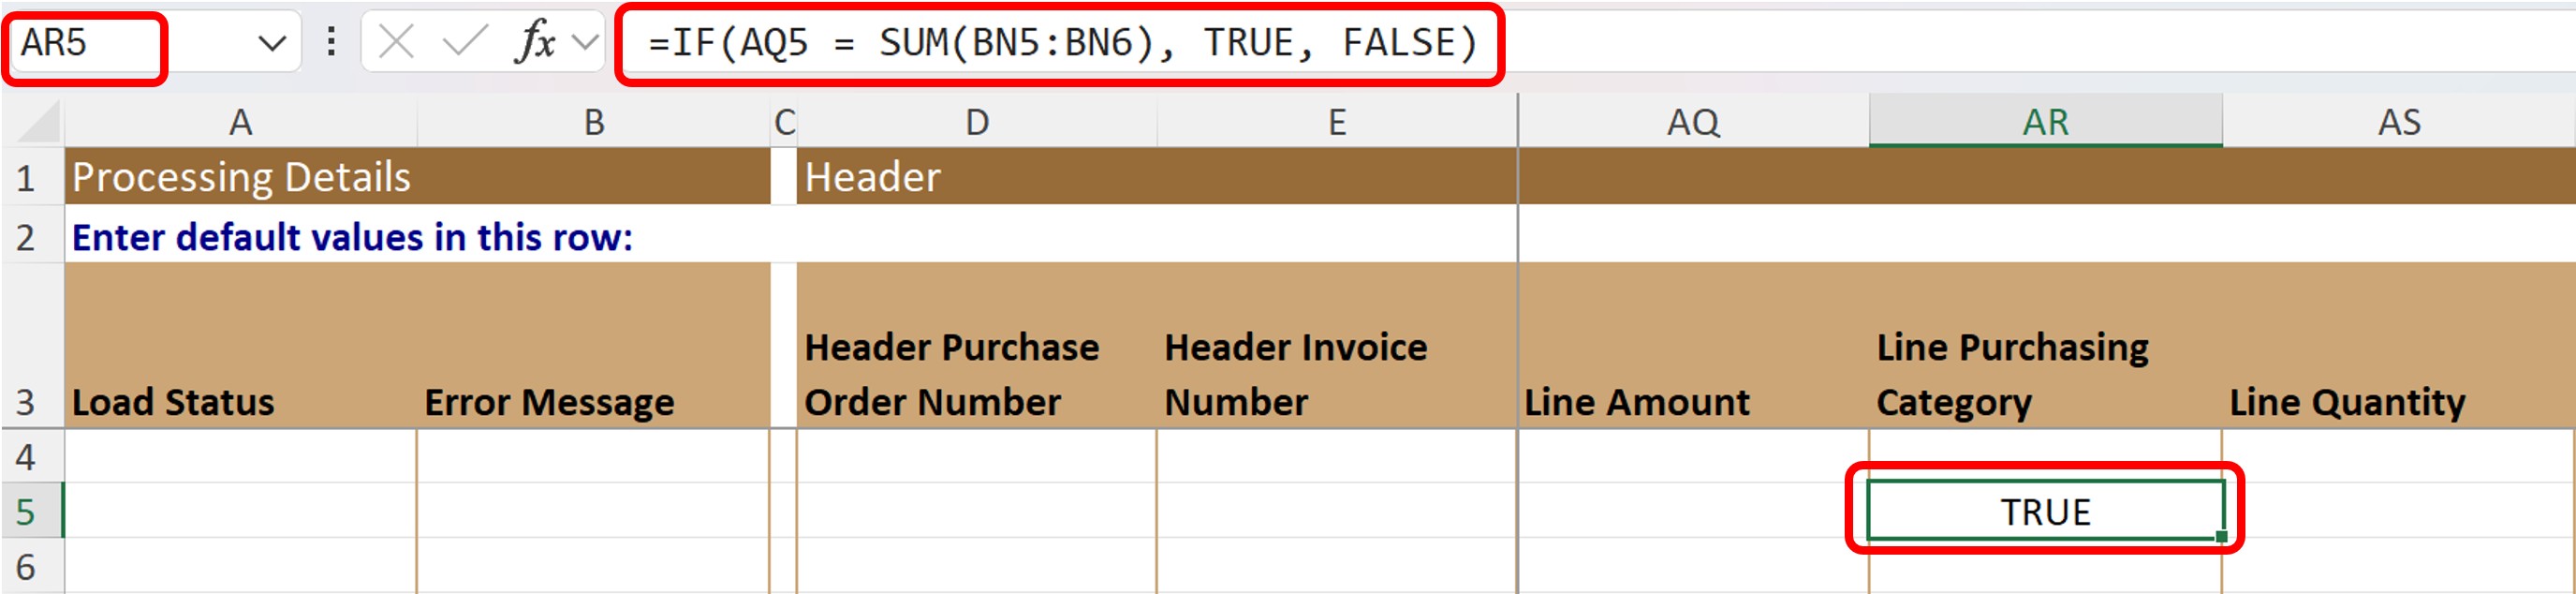
5. In the Controls section, select 'Excel Formula Based - Validate Transaction'. This will open the form for validation setup.
6. Enter AR5 as the formula cell address.

7. Click the Convert button. This will populate the Entered Formula, Simplified Loader's Formula, and Relevant Section fields.
8. Complete the other required fields:
Rule Name: Line Amt Validation
Evaluation Sequence: 10
Execute for Operation: Create Invoice
Error Message: The sum of distribution does not equal line amount.

9. Click the Save New Rule button to add the rule to the validation process for the "Create Invoice" operation.
10. Close forms. 11. The formula entered in cell AR5 in the DataSheet can now be deleted. 12. Save the template.
This template can now be distributed to the users. When users perform the "Create Invoice" operation using this template, it will automatically validate all lines based on the rules saved by the administrator. Note: In templates containing Excel Formula-Based validations, users are still free to add, remove, or move columns in the Excel template.
Excel Formula Based - Derive Field Value
In Simplified Loader templates, Excel formulas can be used to automatically derive field values, ensuring data completeness and accuracy. This is particularly useful when a field is left blank either due to unknown values or because the field has been hidden from the DataSheet by an administrator. In such cases, the configured formula populates the field value before the data is submitted to Oracle.
The Excel Formula Based – Derive Field Value functionality is a one-time setup in which an administrator defines a formula to calculate a field’s value. Once configured, the Excel template continues to function normally. During transaction execution, the formula automatically triggers and derives the required value before the data is processed by Oracle.
Guidelines to write a formula: - Enter the formula in the field for which you want to derive the value - Use an Excel aggregate function when referencing fields in child sections, in the context of the field being derived - The formula can reference relevant fields from the section for which the field value is being derived - The formula can also reference relevant fields from parent or child sections of the validation section
NOTE: If the field contains a value in the DataSheet, the formula does not execute for that row. The formula is triggered only when the field is left blank.
After writing the formula in accordance with the above guidelines, the formula must be integrated into transaction processing by creating a new "Excel Formula Based – Derive Field Value" rule from the Admin Panel.
Worked example from the Payables Invoice Template This example demonstrates how to derive the Corporate Rate Type field value based on the Currency field.
1. Enter the formula in the 'Header Conversion Rate Type' field.
=IF(H5 = "USD", "SL_NULL", "Corporate")
Note: By entering the formula in the 'Header Conversion Rate Type' field, you instruct Simplified Loader to derive 'Header Conversion Rate Type' field value based on the Currency field (cell H5).
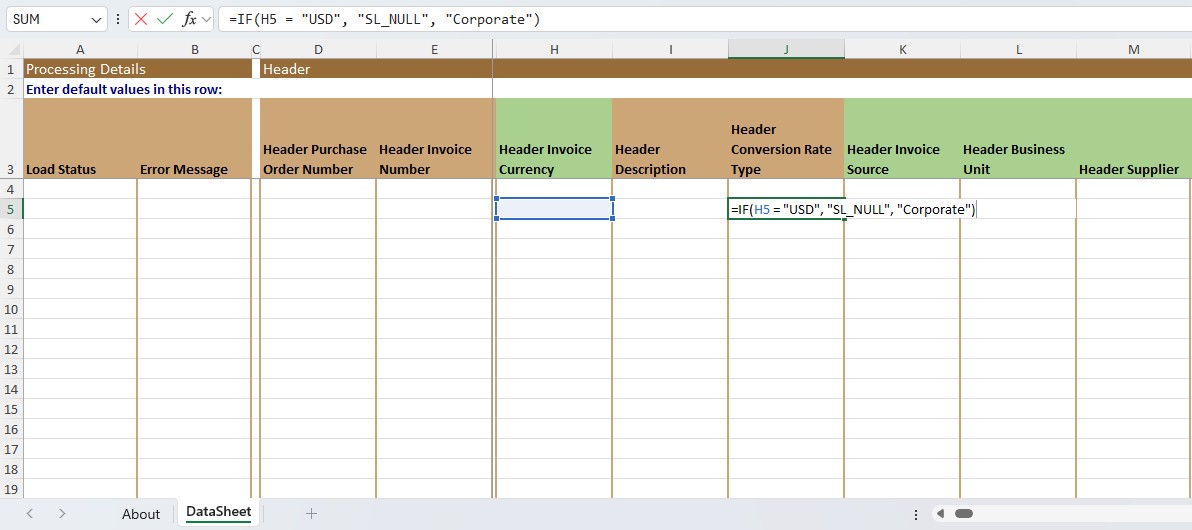
2. Note that the formula is entered in cell J5.
3. Navigate to the Admin Panel.
4. In the Controls section, select 'Excel Formula Based - Derive Field Value' to open the form for setting up the field value derivation formula.
5. Enter J5 as the formula cell address.
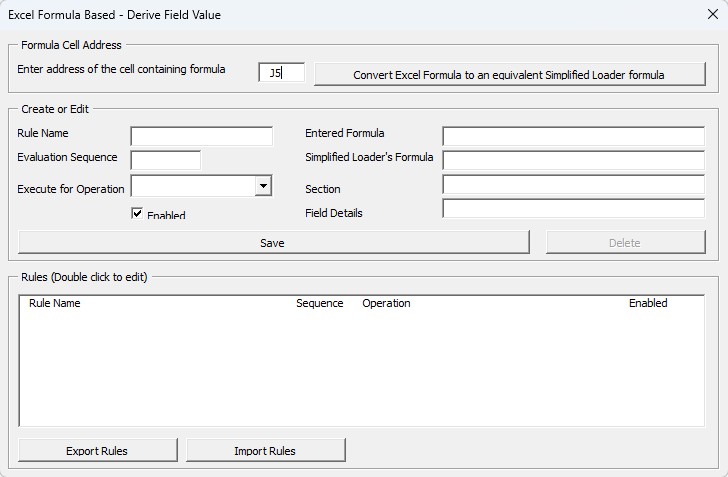
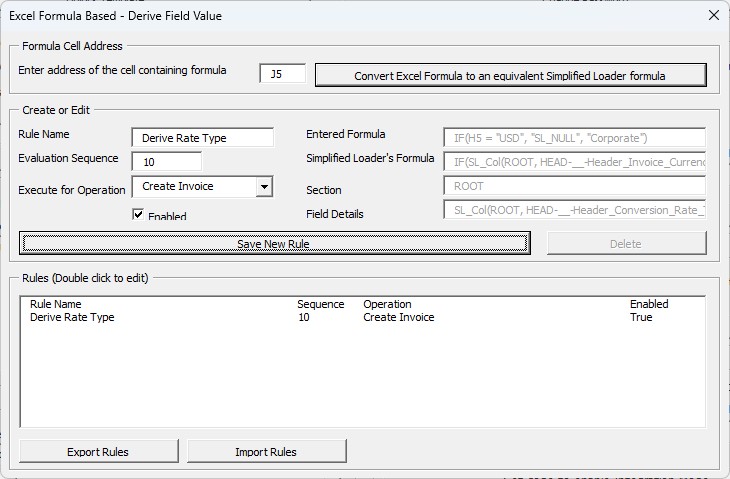
6. Click the Convert button to automatically populate the Entered Formula, Simplified Loader's Formula, Section, and Field Details fields. 7. Complete the other required fields: Rule Name: Derive Rate Type Evaluation Sequence: 10 Execute for Operation: Create Invoice
8. Click the 'Save New Rule' button to add the rule to the field value derivation logic for the "Create Invoice" operation.
9. Close forms. 10. The formula entered in cell J5 in the DataSheet can now be deleted. 11. Save the template.
This template can now be distributed to the users. When users perform the "Create Invoice" operation using thee template, it will automatically validate all lines based on the rules saved by the administrator. Note: Templates that use Excel Formula-Based logic still allow users to freely add, remove, or rearrange columns in the Excel file.
Application control preferences
When a user logs in to Oracle Fusion using the Simplified Loader template, their login is validated using Lookup Type in Oracle Fusion. At the time of login, the Simplified Loader template reads the text entered in the Description field of the Lookups setup. The template uses values entered in the Description fields to control the template behaviour.
The Description fields can be set up with predefined preferences that control the template's behaviour. The administrator can choose to use one or more preferences. When using multiple preferences, enter the pipe (|) delimiter between preferences.
Version Control
The administrator can control the Simplified Loader template version used within the organization. To implement version control, the administrator must specify the template version in the lookup type description field. Optionally, the administrator can also define a short message for the user. This message is displayed to the user when the version used by the user is not same as the version defined by the administrator in the template.
1. Get the version details of the template that you want to use within your organization. Click here to know how to get the template version.
2. In Oracle Fusion, navigate to the Lookup Type associated with the template.
3. Enter preference LatestVersion[TemplateVersion<;Optional message>]. Replace the text TemplateVersion with the version that you wish users to use. To include an optional message, use a semi-colon and add a short message.
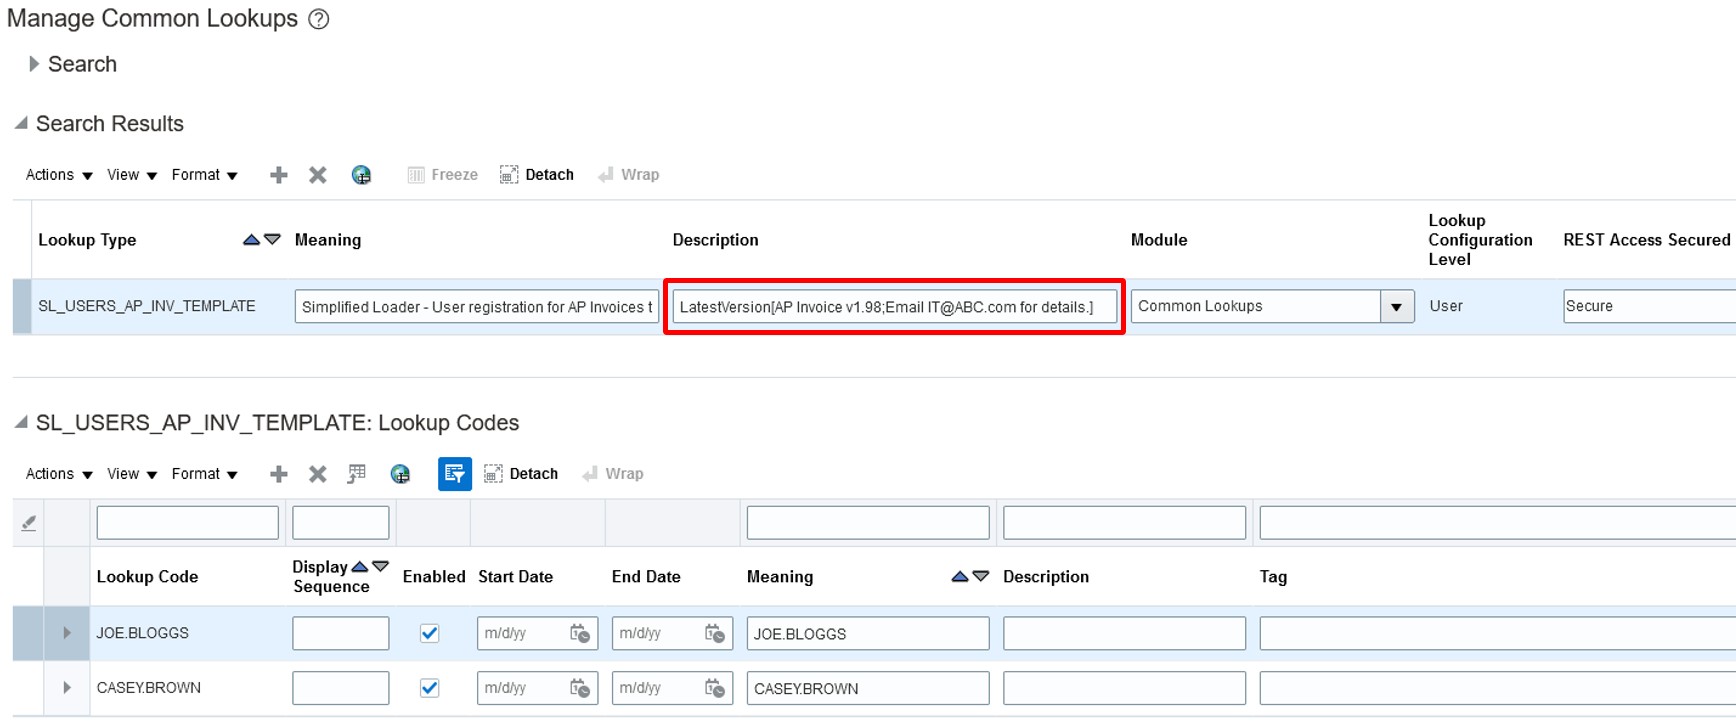
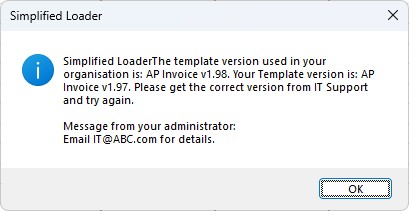
4. When the user logs in, the login process reads content from both the Lookup Type's description as well as the user-level Lookup Value's description to validate the template version before uploading any data. The user receives the following message if the version specified by the administrator does not match the template version used by the user.
Allowed Operations
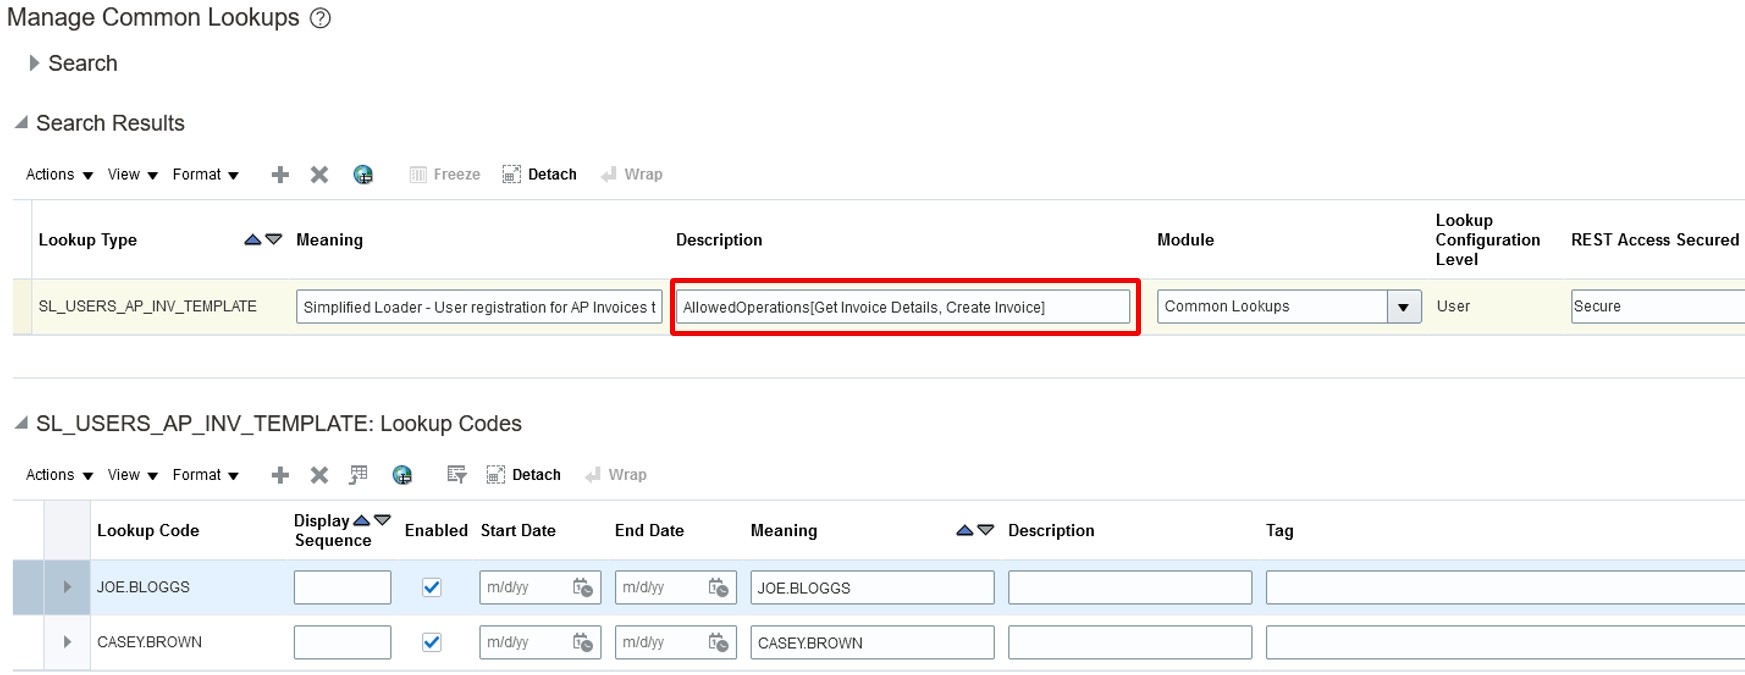
The administrator can control user's access to the operations available in the template. To implement access control define AllowedOperations preference and specify the permitted operations. To specify multiple operations, use AllowedOperations preference with multiple comma-separated operations. The default value of AllowedOperations preference is ALL.
Example: The Payables Invoice template provides the following operations

Preference AllowedOperations[Get Invoice Details, Create Invoice, Update Invoice] will allow the user to perform three operations mentioned in the preference.
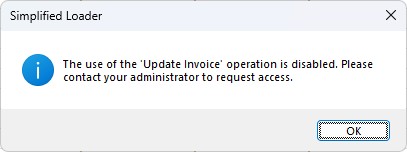
If the user clicks on the 'Update Invoice' operation, they will receive the following error message.
Disallowed Operations
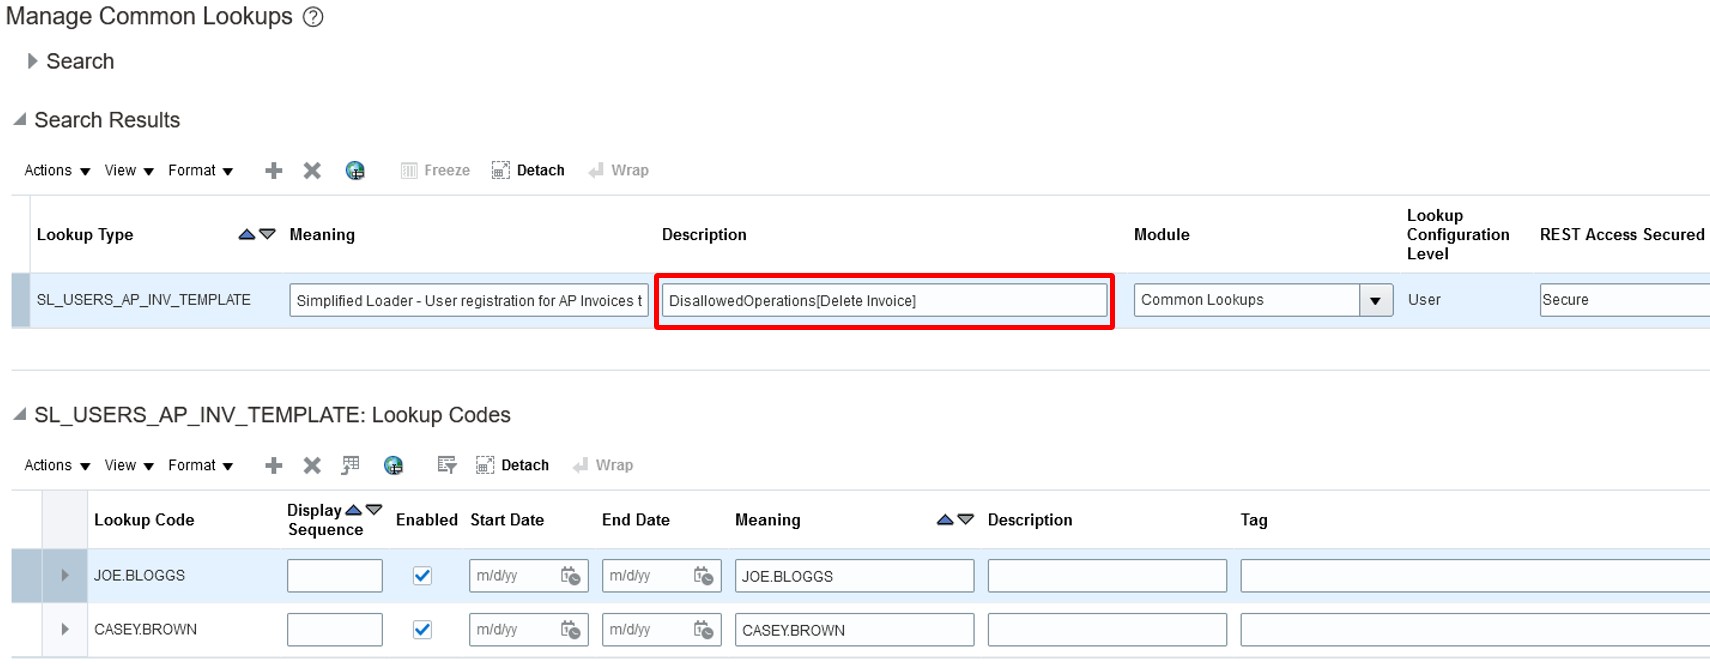
The administrator can control user's access to the operations available in the template. To implement access control define DisallowedOperations preference and specify the operations not permitted for a user. To specify multiple operations, use DisallowedOperations preference with multiple comma-separated operations.
Example: The Payables Invoice template provides the following operations
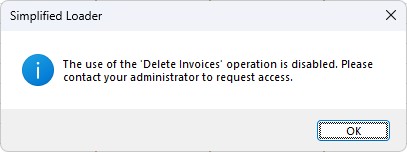
Preference DisallowedOperations[Delete Invoices] will stop the users from performing the Delete Invoices operation.
If the user clicks on the 'Delete Invoices' operation, they will receive the following error message.
Integration mode (TransactAs preference)
Enabling Integration mode allows the user to perform operations as a centralized user. The following figure demonstrates how login credentials are selected when the Integration mode is enabled.
1. Open Admin Panel
2. In the Enable Integration Mode section, select the environment and enter the Integration user's username and password. The Integration username and password is only used for transactional purpose and not for querying data.
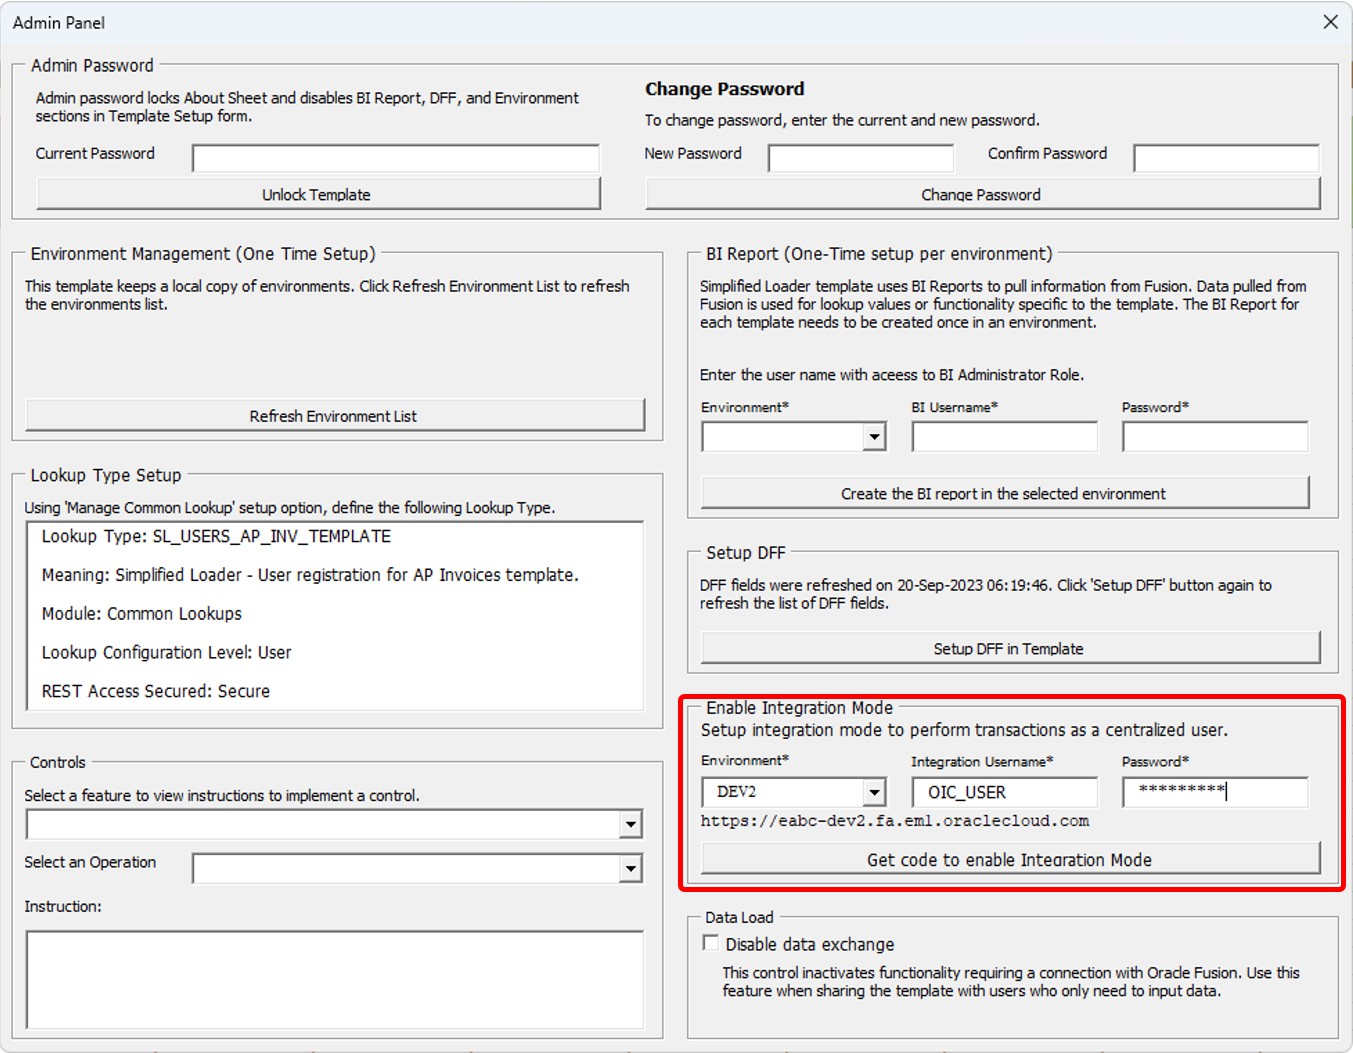
3. Click 'Get Code to enable Integration Mode'. This will display Enable Integration Mode window with unique code based on the entered username and password.
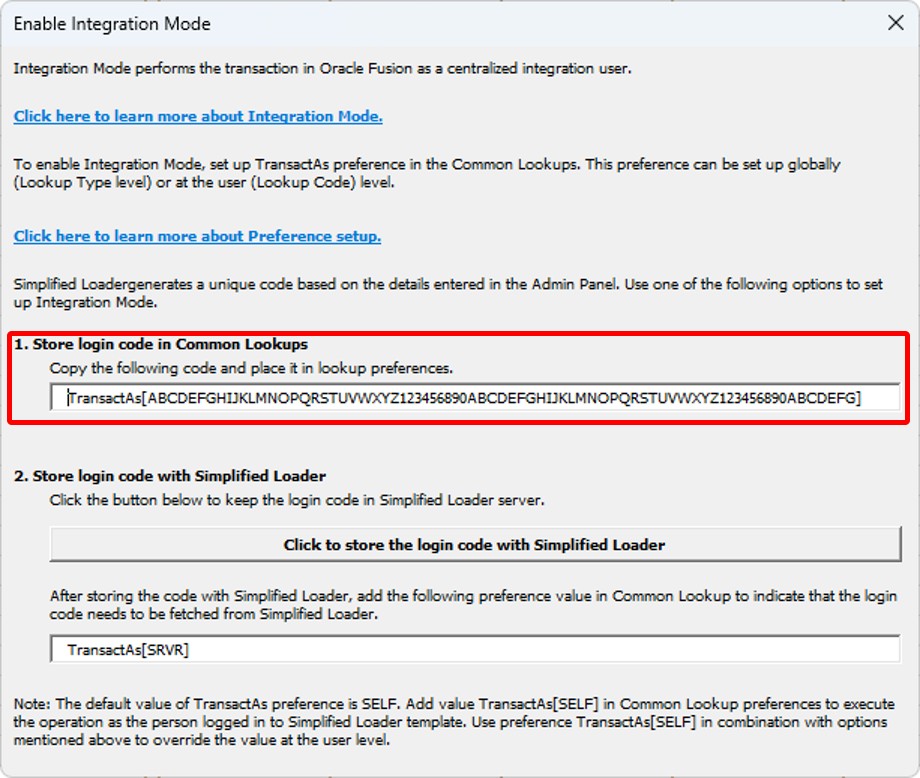
4. Setup preference in the associated Lookup Type using TransactAs[ObfuscatedCode] or TransactAs[SRVR]. NOTE: Before using SRVR as a preference value, the administrator must click on the 'Click to store the login code with Simplified Loader' button.
5. The default value for TransactAs preference is SELF. Preference TransactAs[SELF] indicates that the transaction should be performed using the user's login credentials logged in to the Simplified Loader template. TransactAs{SELF] is the default behaviour.
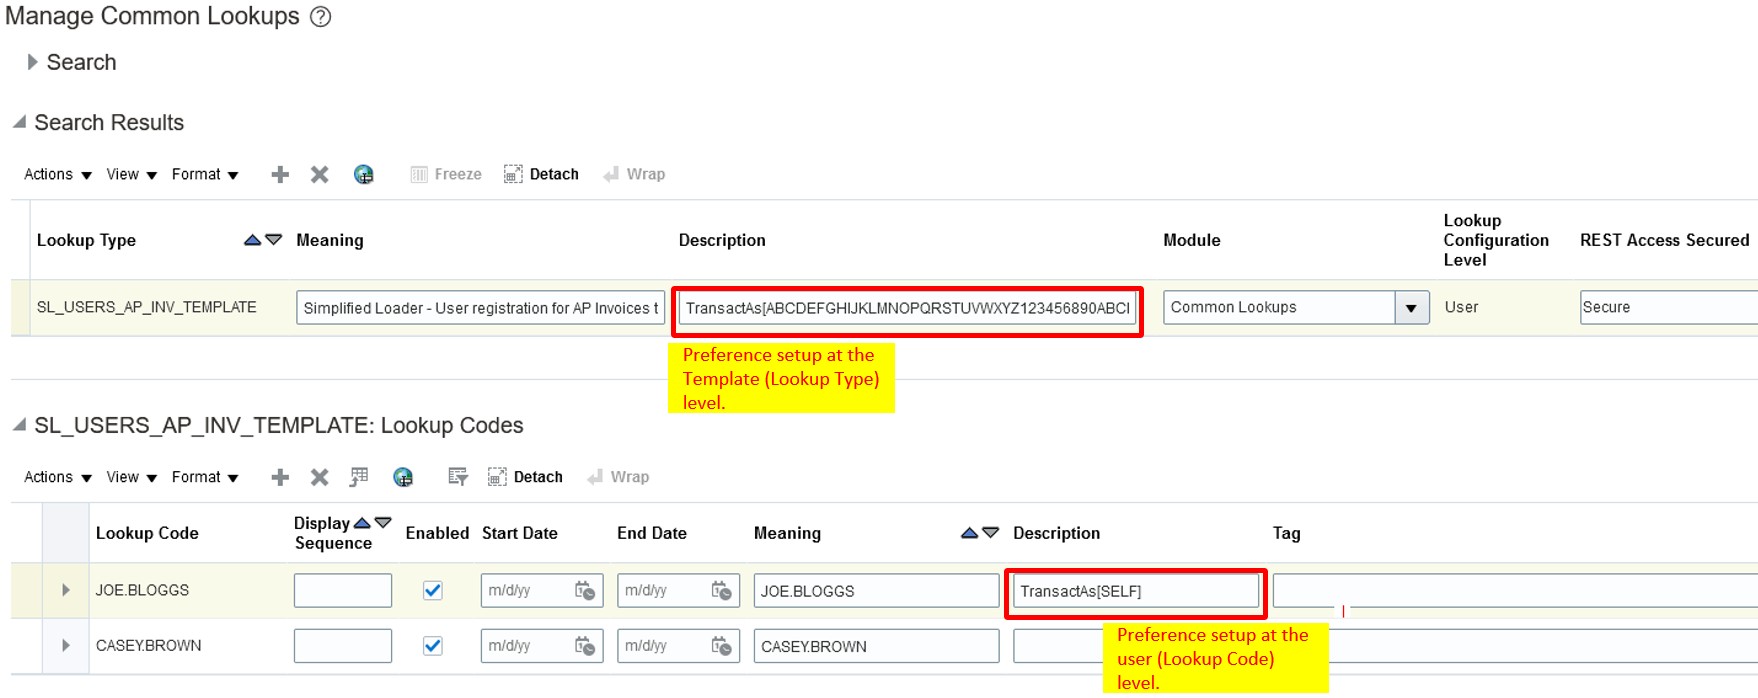
Override application control preferences at the user level
The Preferences defined above can be set up at the Lookup Type (global) level or Lookup Code (user) level. When the same preference is defined at the Lookup Type and Lookup Code levels, the Lookup Code level preference takes precedence.
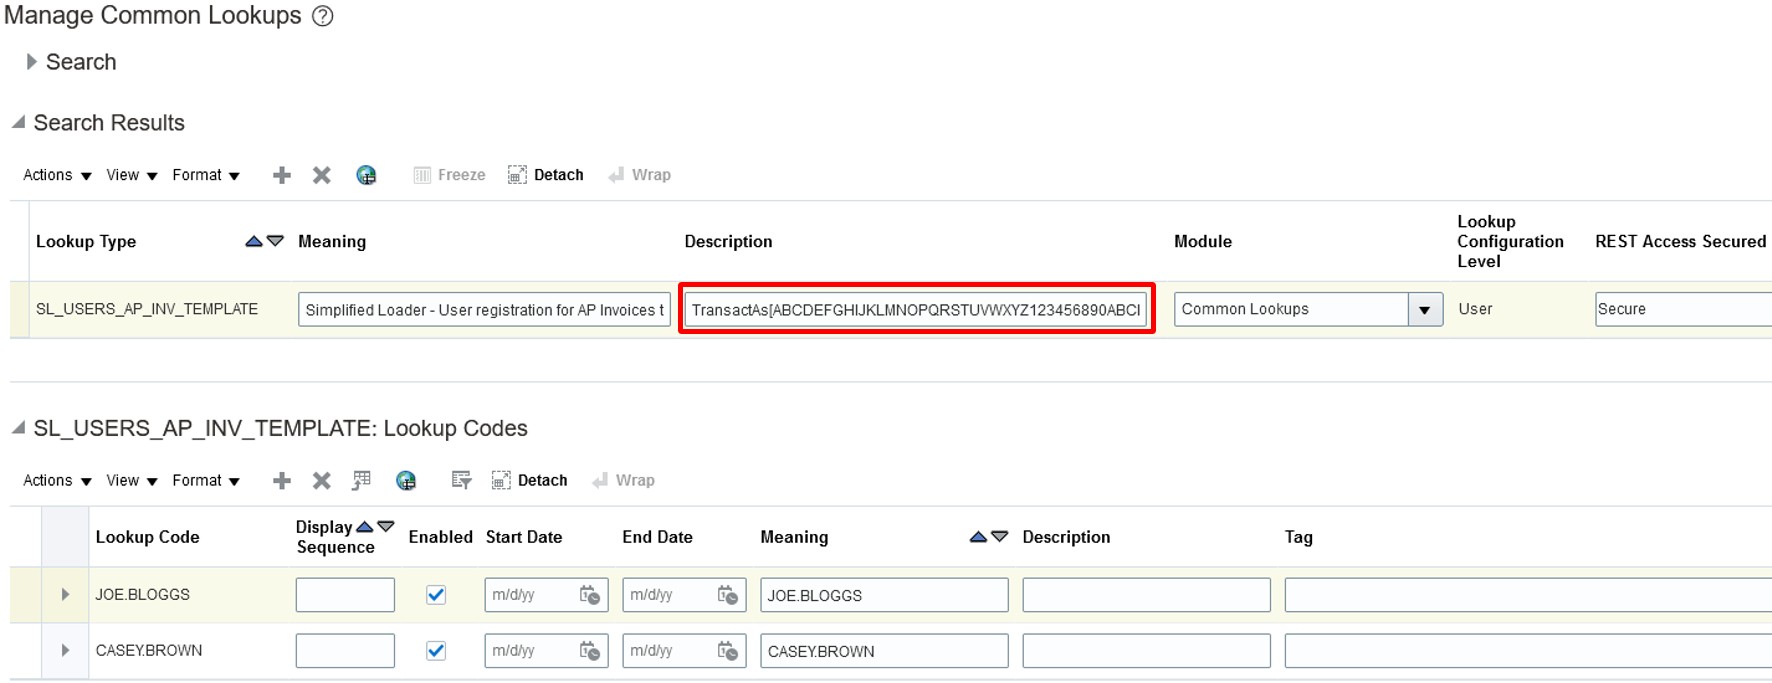
For example, the following setup will enable Integration mode for all users using the template linked to the given lookup.
The following screenshot demonstrates setup with preference override at the user level.
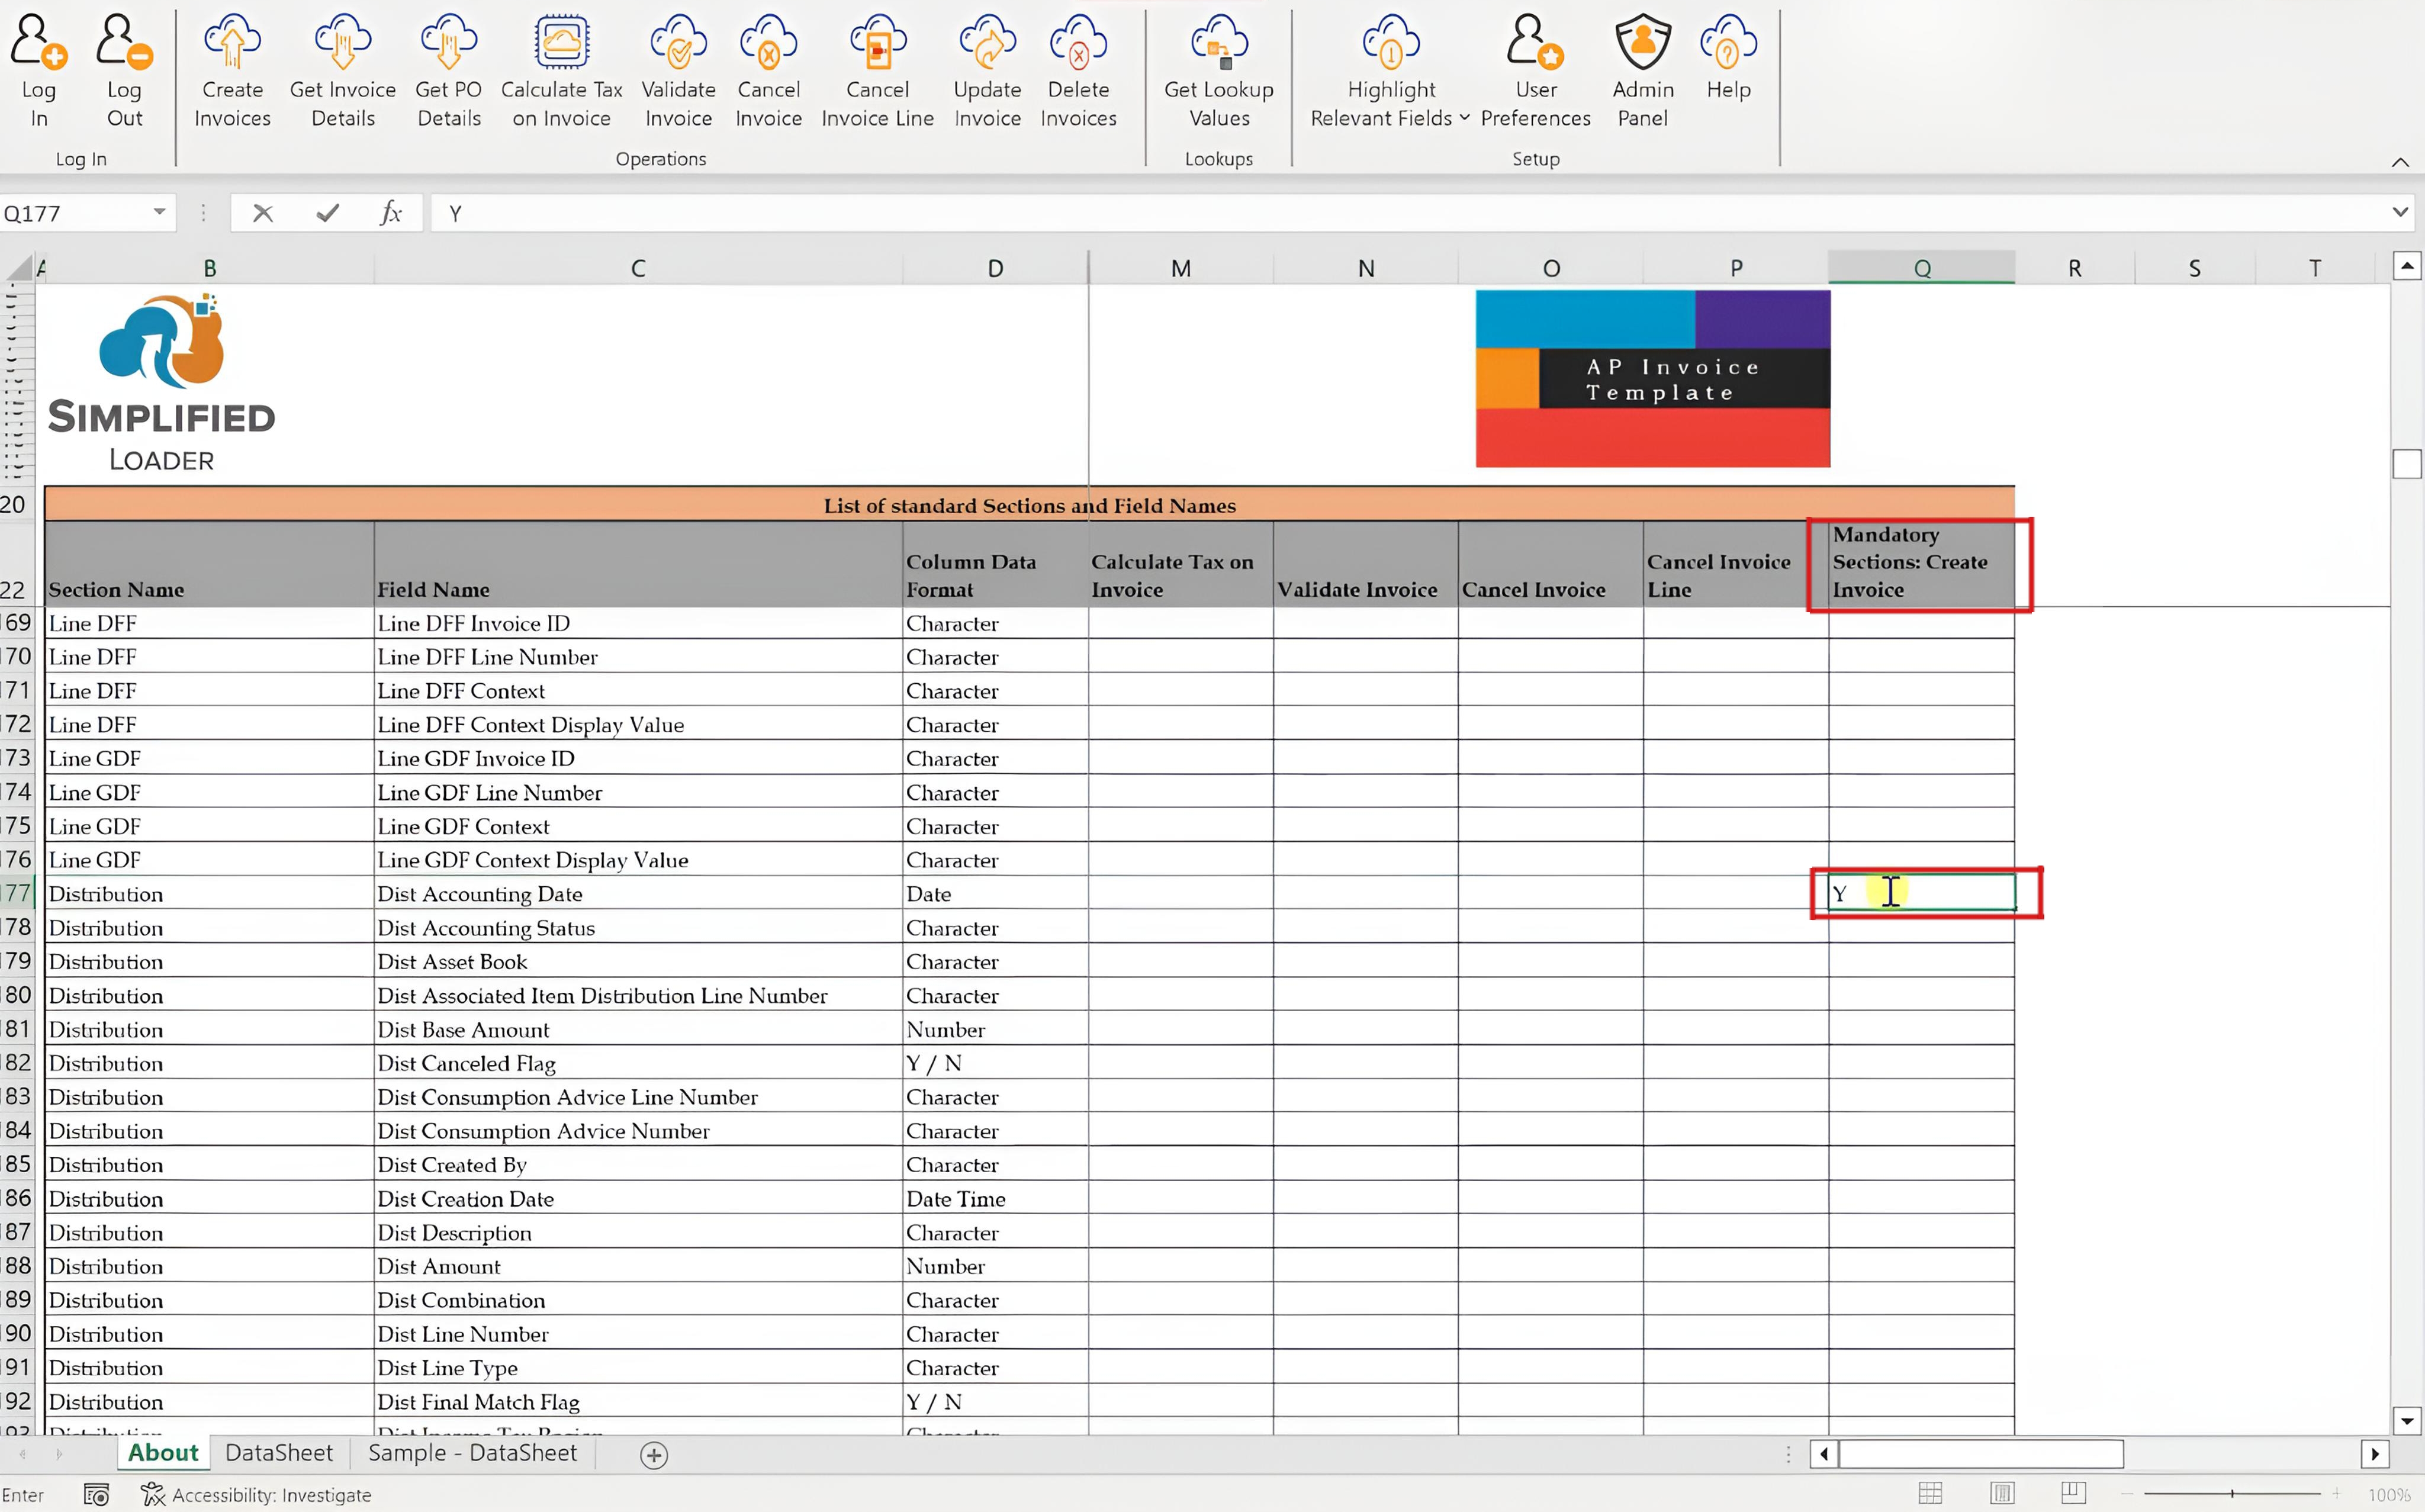
Mandatory Section
The 'Mandatory Sections' control allows the administrator to define required sections. This control must be used in conjunction with the 'Mandatory Fields' control. The limitation of the 'Mandatory Fields' control is that it only comes into effect when at least one field in the section is populated. If the user does not populate any field in a section, the 'Mandatory Fields' control will not apply to that section. To overcome this limitation, the 'Mandatory Sections' control should also be defined. Similar to the 'Mandatory Fields' control, the 'Mandatory Sections' control needs to be configured for each operation.
The screenshots below demonstrate how to apply the 'Mandatory Sections' control to the 'Distribution' section for the 'Create Invoice' operation:
1. Navigate to the Admin Panel in the Excel template.
2. In the Controls section, select the 'Mandatory Sections' control, and choose the operation to which the control should apply. This will display the instructions for setting up 'Mandatory Sections'.

3. Navigate to the About sheet and insert a column. In row 22, enter the column name as "Mandatory Sections: Create Invoice".
4. Enter "Y" against any one field in the 'Distribution' section. Note: Marking any one field of a section as mandatory makes the entire section mandatory.
5. Save the template.
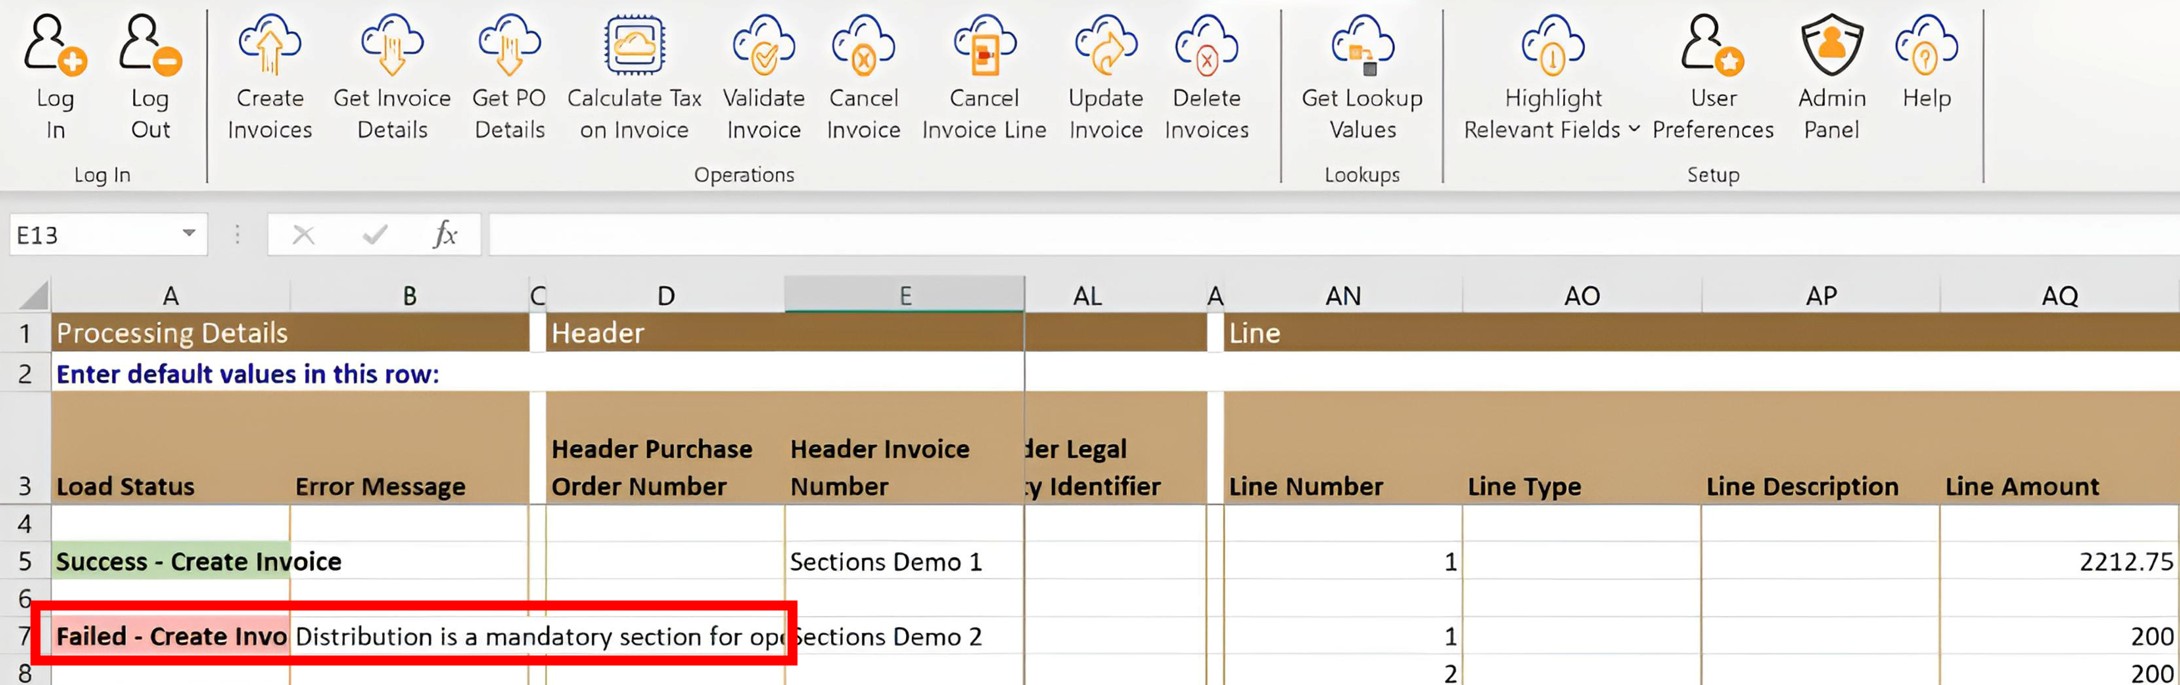
6. With this setup, if no fields in the 'Distribution' section are populated during the 'Create Invoice' operation, the user will receive the following error message.
Customize data selection criteria
If you have an specific requirement to restrict data, please contact Simplified Loader support by logging an incident using the Support Portal.
Custom validations & data enrichment
If you have an specific data validation & enrichment requirements, please contact Simplified Loader support by logging an incident using the Support Portal.
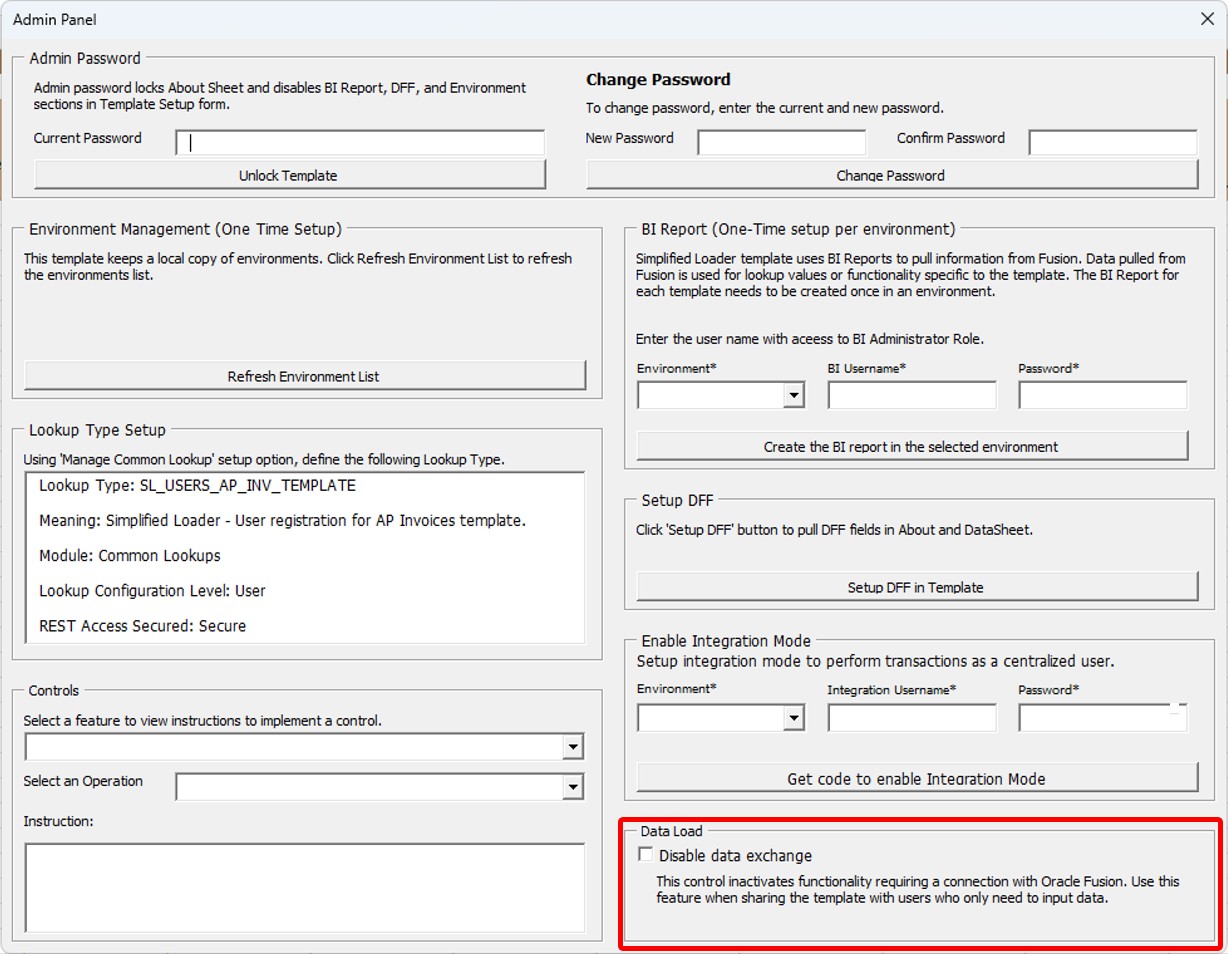
Disable data load
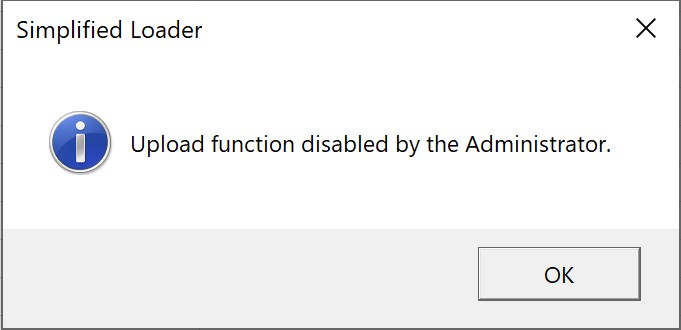
Simplified Loader templates can be shared with other recipients for data input. Before sharing the template with other recipients the administrator can optionally disable all data load operations. By disabling the data load operation, the recipient can enter data and use the downloaded lookup values, but they won't be able to exchange data with Oracle Fusion using the Simplified Loader template. This feature provides an extra layer of protection on top of the controls implemented using Lookup Type.
Under such circumstances, if the recipient was to attempt to log in, the following message will appear: